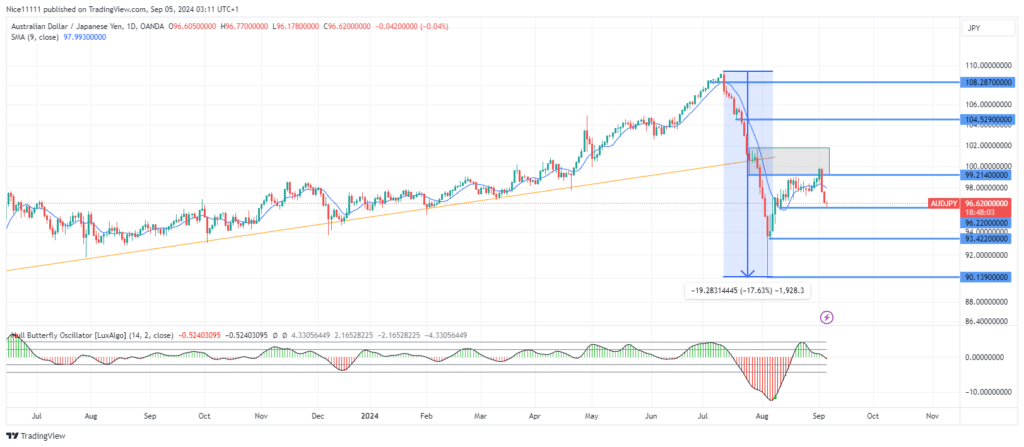
AUDJPY has resumed its bearish trend following the completion of a correction phase. After rising into a key supply zone at 99.210, the pair encountered significant resistance, which triggered a sharp decline in price. This marks a continuation of the broader downtrend that has dominated the market for several weeks.
AUDJPY Key Levels
Demand Levels: 96.220, 93.420, 90.140
Supply Levels: 99.210, 104.530, 108.300
AUDJPY Long-term Trend: Bearish
The long-term bearish trend became clear when AUDJPY broke below the demand zone at 104.530, which had previously acted as a key bullish order block. Additionally, the breakdown of the support trendline confirmed the shift in market sentiment. Since the onset of this bearish phase, AUDJPY has seen a decline exceeding 17%, reflecting sustained selling pressure.
The initial descent found support at 90.140, where buyers managed to initiate a minor correction. However, the recovery was notably weaker than the preceding bearish movement, indicating that it was merely a temporary correction. As the price approached the supply zone at 99.210, sellers re-entered the market, initiating aggressive short positions. The subsequent price drop below the 9-period Moving Average confirmed the resumption of the bearish trend, with momentum favouring further downside.
AUDJPY Short-term Trend: Bearish
On the 4-hour chart, AUDJPY has taken on a clear bearish structure. The Moving Average has acted as a dynamic resistance, rejecting the price’s attempts to rise further. Currently, the market is testing the demand zone at 96.220, a key level that could determine the next phase of the trend. If the price breaks below this zone, it would open the door for further declines toward the next target at 93.420, offering opportunities for forex signals to capitalize on short positions.
Trade on MT4 with Leverage up to 1:500! Trade on MT4 with Leverage up to 1:500!
X
We use cookies to ensure that we give you the best experience on our website. If you continue to use this site we will assume that you are happy with it.

 AUDJPY Short-term Trend: Bearish
 AUDJPY Short-term Trend: Bearish