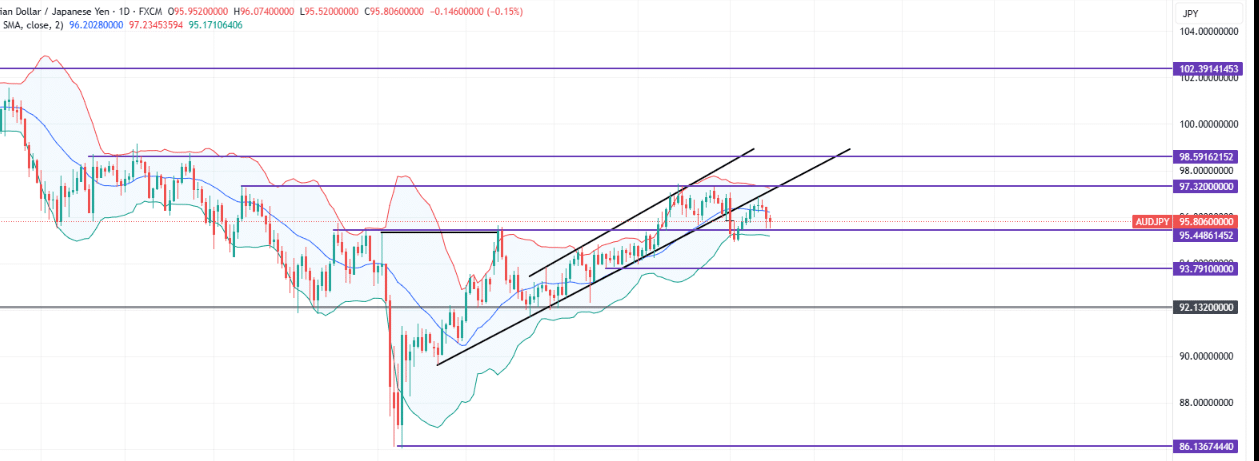
AUDJPY has maintained a steady bullish ascent since retesting the support level of 92.1320 in June. This upward momentum drove the price towards the resistance level of 97.320, where selling pressure intensified, triggering a decisive bearish breakout from a bullish trendline.
AUDJPY Key Levels
Demand Levels: 95.450, 92.130, 86.140
Supply Levels: 97.320, 98.590, 102.390
AUDJPY Long-term Trend: Bullish
The buyers initially faced resistance at 95.680, leading to a corrective pullback toward 92.130. At this level, the market established a double bottom pattern, which served as a strong bullish reversal signal. This formation sparked renewed buying momentum, reinforced by the guidance of a bullish trendline, ultimately driving the price to test the 97.320 resistance level.
However, upon reaching this level, a double top pattern emerged, with the second peak forming as a failed high. This price action pattern signalled an influx of sellers and a potential market shift. The price tested the upper Bollinger Band before sharply reversing, breaking decisively below the established bullish trendline and invalidating its prior upward structure.
AUDJPY Short-term Trend: Bearish
Following the breakout, the market staged a modest pullback toward the broken trendline, where sellers regained control, pushing the price further downward. Currently, AUDJPY is approaching the 95.760 support level. A confirmed break below this zone could pave the way for deeper declines, potentially opening the path toward lower demand levels and signalling an extended bearish correction in the short term.
Trade on MT4 with Leverage up to 1:500! Trade on MT4 with Leverage up to 1:500!
X
We use cookies to ensure that we give you the best experience on our website. If you continue to use this site we will assume that you are happy with it.
 AUDJPY Short-term Trend: Bearish