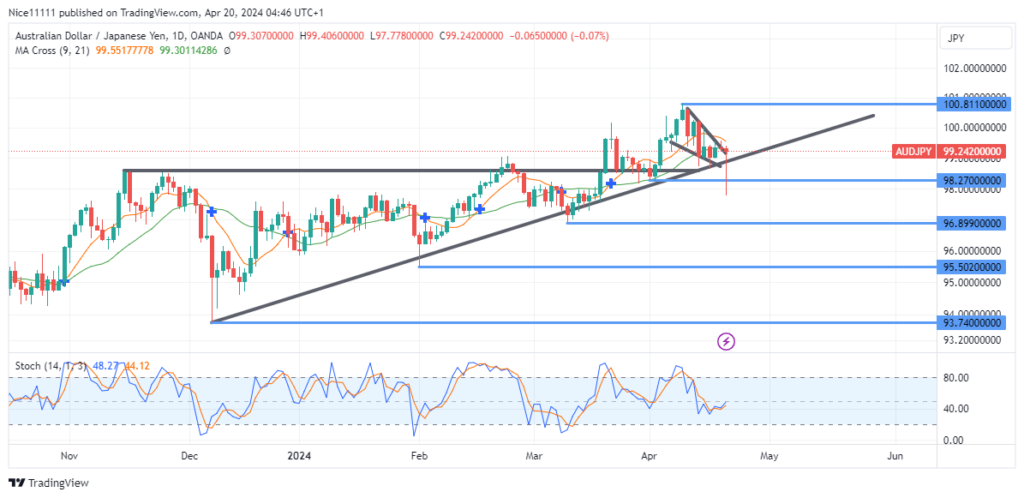
The AUDJPY pair has demonstrated a persistent bullish trajectory since December, characterized by successive swing lows yielding higher swing highs, thereby establishing a coherent bullish market structure. Notably, on Friday, a Pinocchio bar marked a retest of the demand level situated at 97.270. Towards the end of the trading session, the price swiftly resumed its upward momentum, breaching the bullish trendline and reaffirming its uptrend.
The enduring bullish trendline has been instrumental in delineating the prevailing upward trajectory on the daily chart. The consistent formation of higher lows within this bullish trendline corroborates the ascending nature of the market.
However, on April 19th, the market witnessed a sudden plunge below a significant previous swing low, initially suggesting a potential shift in Market Structure (SMS) or a bearish reversal. Moreover, this abrupt downturn breached the bullish trendline, signalling a possible change in market sentiment.
Subsequently, the price descended to test the support level beneath the swing low and the bullish trendline. Nevertheless, the price swiftly rebounded, reclaiming its position above both the trendline and the swing low. This rapid fluctuation in price delineated the formation of a Pinocchio bar, also referred to as a pin bar or hammer candlestick.
Short-Term Trend: Bullish
The sudden downward movement in price appeared to be a tactical manoeuvre aimed at triggering stop-loss orders on long positions, potentially impacting traders already positioned for profit. However, the subsequent resurgence in price above the bullish trendline reflects the underlying bullish sentiment driving the market, suggestive of forthcoming forex signals.
Anticipated Outlook
Given the resilience displayed by the price action and its swift recovery above key support levels, the AUDJPY pair is poised to ascend towards its next anticipated swing high at 100.810. This outlook aligns with the prevailing bullish momentum observed in the market.
Trade on MT4 with Leverage up to 1:500! Trade on MT4 with Leverage up to 1:500!
X
We use cookies to ensure that we give you the best experience on our website. If you continue to use this site we will assume that you are happy with it.

 Short-Term Trend: Bullish
 Short-Term Trend: Bullish