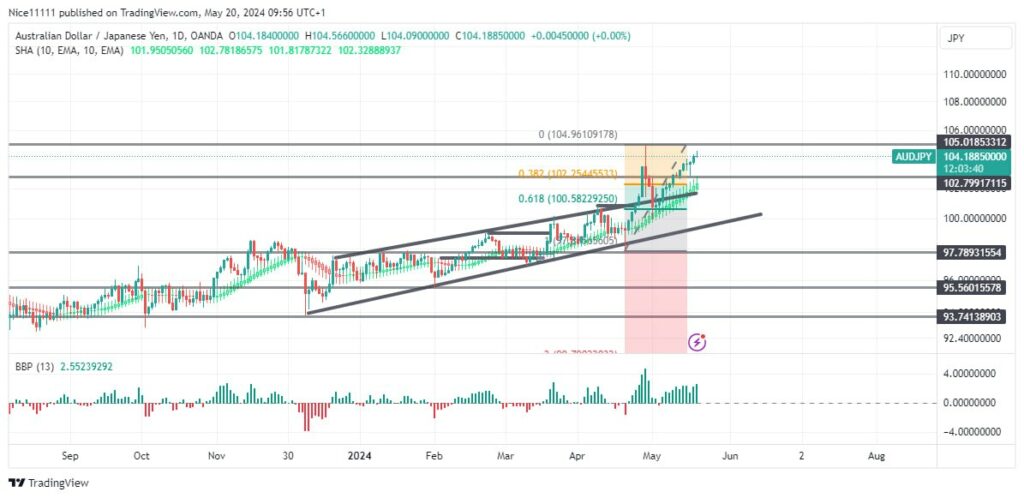
The AUDJPY currency pair has recently exhibited significant bullish momentum. After a period of price correction, it found support at a discounted level, specifically retracing to the 61.8% Fibonacci level. This level is often considered optimal for identifying potential reversals and support zones. In this case, it has effectively propelled the price upwards, pushing it towards the current year’s high of 105.00.
AUDJPY Key Levels
Demand Levels: 97.80, 95.60
Supply Levels: 105.00, 110.00
AUDJPY Short-term Trend: Bullish
In late April, the Bull and Bear Power indicator showed a marked increase in buyer activity, indicating strong bullish sentiment. This surge in buying power facilitated a significant breakout from the parallel channel on the daily chart, a move that marked the beginning of a robust bullish trend.
Following this breakout, the extreme upward price movement led to a temporary period of bullish exhaustion. The market then experienced a pullback to a crucial mitigation block around the psychological level of 100. This level coincided with the 0.618 Fibonacci retracement level, reinforcing its significance as a support zone and highlighting its importance in technical analysis and trading strategies used by the best forex signals providers.
AUDJPY Short-term Trend: Bullish
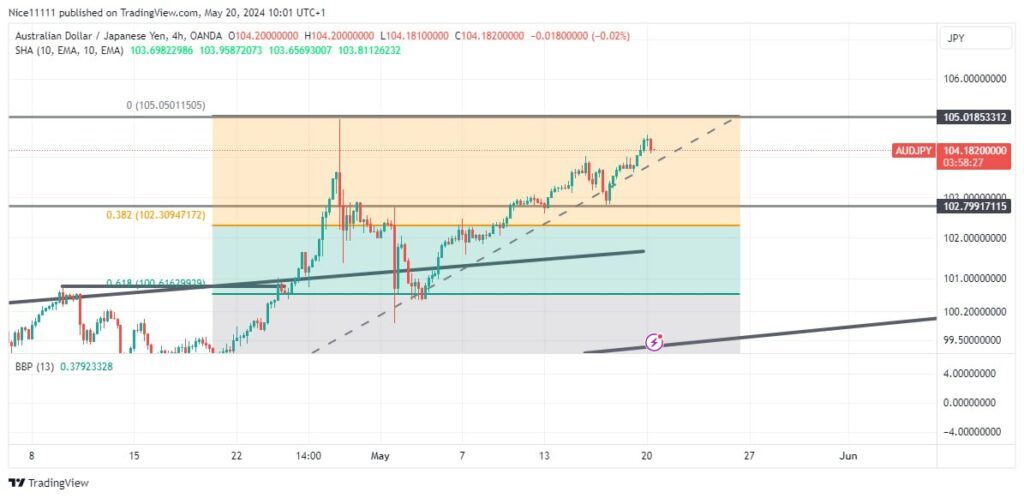
The short-term trend for AUDJPY remains firmly bullish. On the four-hour chart, the price action shows a well-organized bullish reversal pattern, characterized by an absence of stop hunts, which are often indicative of market manipulations or abrupt reversals. The price is currently racing towards the year’s high of 105.00, demonstrating strong bullish momentum.
The Smoothed Heikin Ashi Candles, a variation of traditional Heikin Ashi designed to smooth out price action and better indicate trend direction, remain positioned below the candlesticks. This alignment supports the ongoing bullish stance, providing a clear indication that buyers continue to dominate the market.
Trade on MT4 with Leverage up to 1:500! Trade on MT4 with Leverage up to 1:500!
X
We use cookies to ensure that we give you the best experience on our website. If you continue to use this site we will assume that you are happy with it.